Author Archives: Esther Boehm

RHYTHMS — Links & Layers

1-11 October 2020
Handa Gallery, Wells Maltings

Links & Layers is a group of eight individuals, all living and working in Norfolk. Formed in 2014, our regular meetings mutually encourage, support and motivate each other’s creative development. Through collaborative practice we learn and enrich our work whilst having fun and laughter together. We are committed to our art and keen to share it with others through exhibitions, dialogue and workshops. Continue reading

Creative lockdown

We have all had such different experiences during lockdown. It would be interesting to compare how this has affected our creativity. I don’t know about you, but initially it seemed to suppress my freedom of expression and motivation and I had a real ‘block’. All that extra time and freedom to concentrate on painting and I couldn’t produce anything! Almost in desperation I joined a free online course suggested in Update – Louise Fletcher, ‘Find your Joy’ – and the very simple exercises she suggested bounced me right back to the way I love to work. (More about this course in the next issue of Update.)

I would say my way of working is based on feelings, memories and emotions conjured up by my experiences and surroundings. If you’ve seen my paintings you will know that more often than not they are heavily influenced by my garden or by our wonderful Norfolk coastline. I focus on the process. This can lead me towards unexpected results, which I don’t always expect to like!

So, even more than usual I have found myself considering and doing all of the following:

Using all those materials I’ve been storing away since I did this or that course a few years ago. Don’t hoard it, but be generous and expansive and splash it about!

Limiting the palette (which I always tend to do), but using colours I wouldn’t normally choose. Again, often left over from sets of paint given as a gift or as part of a course. I’m sure we’ve all got lots of unused colours.

I’ve run out of canvases, so have been using anything to hand – old bits of board in the shed, printer paper etc. It’s been good to work on a different scale and not worrying about what it all costs is very liberating. I’ve rediscovered old half empty sketchbooks and enjoyed filling the pages with experiments and notes, using different tools and media.

As I used to say to students when I was teaching, ‘you can’t get it wrong’, even if you don’t always like the results. Be prepared to fail, as this means you are taking risks and are more likely to be open to new ideas. But most of all enjoy yourself!

Lesley Williams

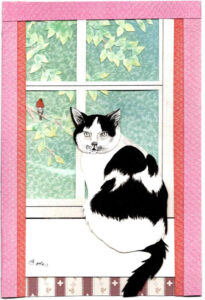
Cat and Robin Layered Papercut

click on images to enlarge them

I was asked how I did the cat and robin layered papercut.
For this article I have simplified the stages, number of layers and individual pieces used.
From a master drawing, on A4 (60gm) tracing paper I traced guidelines to create a 10” x 7” image (inclusive of 1/2” bleed all around) to be cut down to a 9” x 6” finished image.
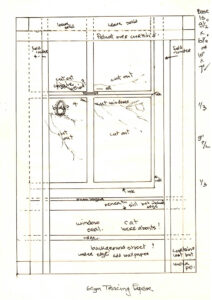

MY BASIC PATTERN.

1. BACKGROUND.
An A4 piece of knobbly-textured watercolour board (270gms) was used to accommodate the 9” x 6” image. Fine dust was scraped off a green and a blue pastel stick – NOT oil pastel – and rubbed in with kitchen towel. The more the dust is rubbed, the smoother, less streaky, the colour becomes. I darken by adding more dust or lighten gently with a soft or plastic eraser.
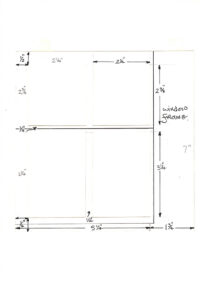


WINDOW FRAME.

WINDOW FRAME.

2. WINDOW FRAME.
Using 100gm white paper – 7” square – the 4 glass panes were cut out. An ink pen divided the upper and lower portions and defined the right-hand border.
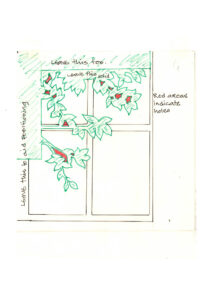


PATTERN FOR LEAVES.

PATTERN FOR LEAVES.

3. THE LEAVES.
In one piece, the leaves were carefully cut out of 100gm paper with a scalpel. Coloured with yellow and light green, pastel dust was rubbed in with cotton buds. For deeper colour I stroked the cotton bud along the pastel stick and rubbed heavily on the ends of the leaves. To fix the position of the leaves behind the window frame, I used 112gm tracing paper to trace and indicate the upper and lower removed panes. Leaf pattern is shown in green. Red areas denote holes cut out.
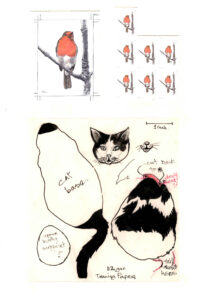


Robin & Cat

Robin & Cat

4. ROBIN.
The 5/8” robin was drastically reduced, in 2 stages, from a 51/2” original drawing of mine. Cut out (very fiddly!) and stuck behind the bough it sits on, with claws inked on the front of the bough. When all three of these parts were finished, the leaves and robin were glued behind the frame and then glued onto the background, using the first traced pattern to show its position.


5. CAT.
The pattern for the cat is shown to the right, together with an upper body support. Made from 3 pieces I used a light box to lay this tracing on, and with heavyweight cartridge paper (220gms) laid over, I gently drew the shapes and markings, which I inked in before cutting out.
The face can be put on the body base at any angle, with a bit of the top black showing between the ears. The furry back is stuck on the body base too. A white area (shown red for clarity) is cut alongside the black left shoulder, to form a white right shoulder flap to glue under the cat base to hold its position. (See PDF 5 for how I placed it.) I put the complete cat aside and heavily inked under the window frame. I glued a piece of wallpaper to show under the windowsill.

6. WINDOWSILL.
I made this from pale tinted and spotted 100gm paper, wider (1 5/8”) than first planned. A 3/16” piece was cut to represent the edge, not obvious when scanned. Allowing a tiny gap of the black ink to show under the window frame, I glued the windowsill over the wallpaper.

7. CURTAINS and PELMET.
Using textured, off-cream paper (220gms), I cut 2 pieces (10” x 2 1/8”) and gently marked both at top and bottom 1”, 1/2” and 5/8”. I scored and folded down the 1” mark. I turned both over and scored down the 5/8” mark. Looking end on, the paper was Z-shaped. Using the same textured paper, the pelmet was cut 7” x 1” long.
Opening the 2 curtain shapes, I coloured the 5/8” areas only, in a heavily applied red pastel dust, rubbing it in to give a patterned effect. Before sticking both the 1” sides down on the red, I slid in a spare piece of paper to protect the red and covered the wider sides in pale mauve pastel dust, rubbing it in vigorously, to achieve the same patterned effect. Spare paper removed, the mauve was stuck down over the red. The pelmet was coloured the same way. Each curtain was stuck down from the 10” side edges. The pelmet was stuck down over the curtains from the top 7” edge. The curtained window was placed on clean paper, another clean sheet placed over it and under 2 heavy books.
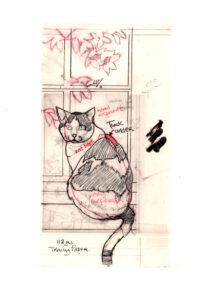
8. COMPLETION.
Using the image to the left as a guide, I glued the cat, with its upper body support on the back, to the window frame and sill. Finally, I trimmed 1/2” off all around to give the 9” x 6” picture. There is no need to do so if the artwork is to be framed.
Final word: to enhance the glass appearance, I put a thin sheet of cellophane between the window frame and leaves. When scanned, it gave a flare mark in the lower left panel. So, leave it out, it was not a good idea!

*** FINIS ***

David Cook
Musings of an Amateur Artist

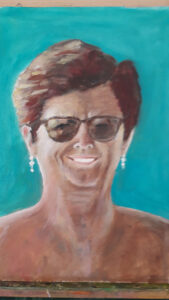
Debbie 60th birthday Oil on board.

Debbie 60th birthday Oil on board.

I paint because I enjoy it – not because I’m good at it.

This title was paraphrased from a T-shirt I saw about playing a guitar, which I also happen to do with a fairly amateur level of competence. So, I thought the sentiment was particularly relevant to me and my painting.

As a self-taught, (except for a few short weekend courses) amateur painter who has only been painting for a few years, I am aware of my limitation and ability and that much of my work is below “artist” standard. However, despite this, the most important thing for me is that painting gives me enormous pleasure. That doesn’t mean that I am content with the level that I am at. I still wish to improve and develop from a “hobbyist” to an artist.

I am convinced that being a member of WNAA has improved my art and will continue to do so. Meeting and talking to other members about their art and seeing members art at the “live” exhibitions but also, to a lesser extent, the on-line exhibitions and challenges, is a great inspiration.

Like most members, I suspect, I greatly miss the live exhibitions. However, the on-line challenges have been helpful to me. They have given me a nudge in different directions from my usual style. I regret having not taken part in the self-portrait challenge, lacking confidence as I had never painted any portrait. I have since completed my first and really enjoyed doing it.

I enjoy being on the WNAA committee, doing what I can to help the rest of the committee do what we can for the benefit of all WNAA members and I hope to continue to do this.

I look forward to when we can all get together to chat and see each other’s art. In the meantime, stay safe everyone.

Chris Peel

Abstract

Thinking Deeply, Andrew Schumann

Thinking Deeply

I have been thinking about an ‘abstract’ image for the next online show and have made a choice.

Last Tuesday evening I was sitting out on our terrace, with my back facing west towards the setting sun and looking towards the east.  Continue reading

Inspiration- “Where does it come from?”

Several friends have asked me where the idea for my “inside looking out” box came from. It may be of interest to members of WNAA as it clearly illustrates how, over many years, you can store visual information, and much later, use it creatively.   

Some thirty odd years ago I exhibited in a small gallery in Helmsley, Yorkshire. The lady who owned it was the right honourable Jan Needham MP. On her frequent trips down to London she would call and pick up some of my work as I lived just two minutes from Junction 21 of the M1 in Leicestershire. On one of her visits she gave me a small wooden box and asked me to decorate it. She was giving all her gallery artists the same project-to decorate the box, and the proceeds from an exhibition would be donated to charity. The show was a complete sell out.

While in The Range sometime last year, I spotted these small, cheap boxes, £2 each and bought one. It’s been lying around in my studio for months, waiting to be used.
The challenge came from the WNAA, “From the inside, looking out “ and I picked up the box with the idea of only painting on the outside of the lid. Little did I know what would lie ahead.

Jan, my wife, and I spent several lovely holidays in the then peaceful and unspoilt Yugoslavia, now Croatia, and, thumbing through my old sketch books, I came across a small drawing I had made of her looking out over the rooftops of Dubrovnik as the morning sun was coming up over the sea. It fitted the challenge ‘from the inside looking out’ perfectly. 

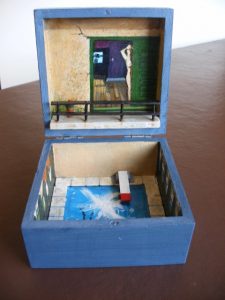
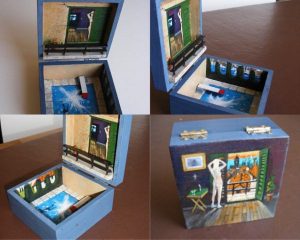
All went well until I opened the box, which looked decidedly empty. The idea came to paint the inside of the box lid, as though looking into the room from the outside. The 3D aspect then appeared via ‘constructing’ the balcony and railings on the inside of the lid, to match with the picture on the outside. The whole thing seemed to develop as it went along, with no original planning whatsoever.

Thinking outside and inside the box acrylic 4"x4”x 2"

Mike Smith, Thinking outside and inside the box acrylic 4″x4”x 2″

At some stage all my pictures tell me what needs doing to make them work.  I am always ‘open’ to that. It usually happens when I am struggling!!!!!! This was certainly the case with this project. A first floor apartment overlooking the obligatory hotel pool seemed the obvious thing to cover the bottom of the box. The pool and splash idea came courtesy of David Hockney’s USA pool images. The whole thing still looked unfinished, until I hit on the idea of painting the pool surround and landscape.

Have you ever tried painting inside a box measuring 4”x4”? The answer was to paint it upside down. The inside walls of the box, not me!!!!!!

In 1977 and 79 I won two prizes, 8th and 1st, in the Saunders, water colour paper manufacturers, bi annual watercolour competition. A part of the prizes was a week’s holiday on Lake Garda in Italy. I made the trip twice.
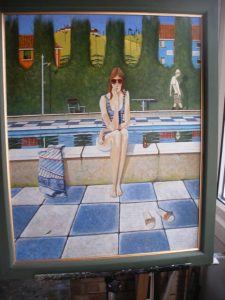
Two years on, in 1982 I completed a large painting [ 4’x3’] in pure egg tempera, of Jillian Stein sitting by the hotel pool. Jillian was another of the prize winners in the competition. The painting still sits in my studio.
 The pool surroundings and immediate landscape were ideal for the inside of my box. Note the enhanced pavement perspective, which became a major part of the picture.

Jillian Stein at Bardolino      4’x3’ egg tempera

Jillian Stein at Bardolino, 4’x3’ egg tempera

The box project could go on for ever. Should I now paint the outer sides of the box to match the inside? The jury is out on that one. The box tells me that could just be a bit OTT.?
My initial contact with a serving member of parliament, and the box idea.
The outside lid, which is sourced from Croatia, via my old sketch book. 
The box inside images from the Hotel Bardolino in Italy, with a bit of Hockney’s USA thrown in.
All come together in a small cheap wooden box in Norfolk. How weird is that????
Look no further than the pre-Raphaelites, who used IMAGINATION and REALITY like no artists have done since, to create their wonderful and evocative images.
The fascinating thing about art is not only the picture, but often the story behind it. If we only took the time and trouble to search it out.

Look after yourselves.
Mike Smith

Art: Obsession or Drug?

I have been asked to put a few words together to run through the thought processes that I go through before putting paint to canvas!

Firstly, art to me is both obsession and a drug. It is a challenge that needs to be met all the time, and a need to be better than the last painting on the easel. Something I feel will never be achieved, but never-the-less that need is still there. I am constantly thinking about the next painting and what subject should it be.

I have a rather strange way of looking at the world of colour. To me it’s not about which colour compliments another, it’s more about what colour can I get away with, after all the eye can be tricked in many ways.

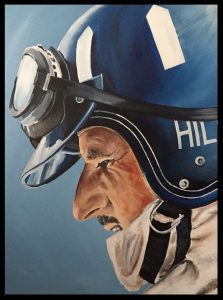
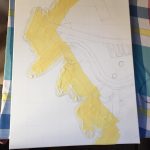
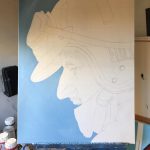
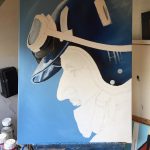
The whole process of painting can be quite complicated depending on the subject that one chooses. Sometimes it’s just a question of seeing something on the TV, freeze framing it, photographing and then painting it. Of course, there is the drawing process to go through. Other times it’s spending hours going through thousands of photos on the internet, looking for inspiration. Again, other times it could be something that a fellow artist has done that gives you some inspiration.

Size always matters, as it determines how much detail can be achieved. I always try to use an 800 x 600mm canvas which gives a 4:3 ratio, whether in landscape or portrait.
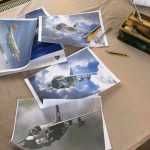
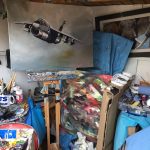
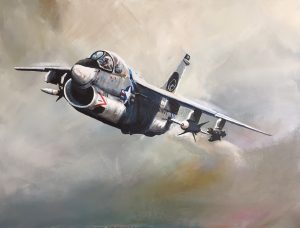
Depending on the chosen subject, I avoid landscapes that are devoid of animals and people. Research can also play a massive part. If, for instance, I have chosen to paint a military aircraft, then everything from correct colouring to the right squadron, and location of the scene has to be researched, and then you can always find some expert that tells you that you have got it totally wrong and there are not enough rivets on an engine cowling!!!


You can end up with a lot of photographs to work from to get the final result

You can end up with a lot of photographs to work from to get the final result

When it come to my paintings of yachts, it’s pretty easy for me as I just have to find the right photo from a portfolio of a photographer that has given their permission to use their work. Then I reset a few things before the drawing process, for instance, remove another yacht or land mass that appears in the original photo. Then it’s all about the drawing, which can take upwards of six hours to complete to the point w here painting can commence. Whatever the subject, the initial drawing is an integral part of the process, and the individual has to decide on the amount of detail that is required. In some cases, this can be quite minimal.

Once drawing is complete, it may be necessary to mask off the main subject. For acrylics I use ordinary masking tape prior to painting any background. Now this is where you can run into conflict. Do you paint the whole background, or part, and some of the main subject? Again, this will depend on the subject.

In short, the process I use varies greatly, depending on the subject. No subject is out of bounds to me, except the standard landscape with no life! Don’t get me wrong there are so many amazing landscape artists out there, but I’ll never be one of them.

Terence Rogers

InterAction

Unlike most members I am not trying to make painterly representations
of the world around us.

I seek to present visual references to what I call InterActions between the physical world and our emotional responses – to curves, volumes and colour masses, hills, holes and hollows – stroking the senses of touch and feeling.  

I look at the relationship between geometric structure (circle, square, curves and straight lines) and forms organic and suggestive.

Attached is a small work I have just completed resulting from ‘lock-down’ contemplation!

Andrew Schumann